How To Cut And Reconnect LED Light Strips Safely
Cutting and reconnecting LED light strips can enhance your home lighting and allow for tailored designs that fit your space perfectly. In this guide, you’ll learn how to safely cut and reconnect LED light strips, ensuring that your project is both efficient and effective. Always remember to follow safety precautions to avoid any electrical hazards during the process.
Disclosure: As an Amazon Associate I earn from qualifying purchases at no cost for you.

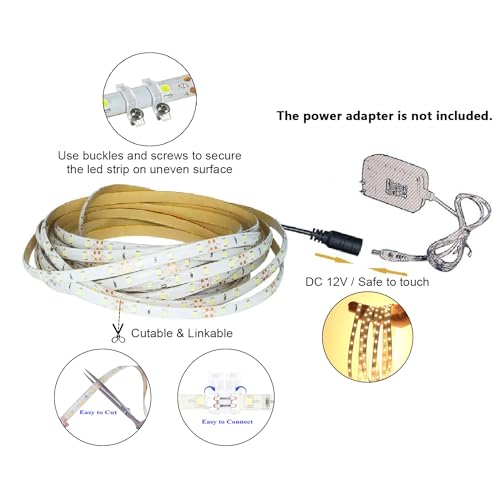
- Note:Power adapter is needed but not included. If you need one, please search "Tasodin D…
- BRIGHTNESS: High Quality 3582 SMD LED Light, High intensity and reliability, 300 LEDs. I…
- SAFETY: Product Advantages: it has longer life time without any COLOR FADE or COLOR CHAN…
What You’ll Need
- LED light strips (e.g., Tasodin Water-Resistance IP65 LED Strip)
- Scissors or a sharp cutting tool
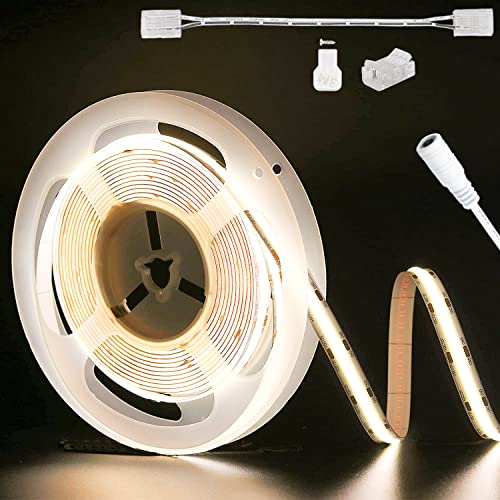
- Wire connectors or soldering kit (if reconnecting)
- Electrical tape or heat shrink tubing (for insulation)
- Power adapter (compatible with your LED strip)
- Ruler or measuring tape
- Marker or pen for marking cut points
- Safety goggles and gloves (for protection)
Step-by-Step
- Measure and Mark: Determine the length of LED strip you need. Use a ruler to measure and mark the cut point on the strip, ensuring you cut at the designated cutting marks.
- Power Off: Before cutting, ensure that the LED strip is unplugged from its power source to prevent any electrical shock.
- Cut the Strip: Using scissors or a sharp cutting tool, carefully cut the LED strip at the marked point. Make sure to only cut at the designated lines to avoid damaging the remaining strip.
- Prepare Reconnection: If you’re reconnecting the cut strip, strip approximately 1/4 inch of insulation from the ends of the wires on both the cut LED strip and the connector.
- Connect the Wires: Use wire connectors or soldering to join the wires of the LED strip. Ensure that positive and negative terminals are correctly aligned. If using connectors, firmly push the wires into the connector.
- Insulate Connections: After making the connections, use electrical tape or heat shrink tubing to cover the exposed wires. This step is crucial for preventing short circuits.
- Test the Connection: Plug the LED strip back into the power adapter and turn it on. Check for any flickering or malfunctioning lights, which may indicate improper connections.
- Secure the Strip: If everything works correctly, attach the LED strip to your desired surface using the self-adhesive backing. Make sure the surface is clean and dry for optimal adhesion.
Pro Tips for Better Results
- Note:Power adapter is needed but not included. If you need one, please search "Tasodin D…
- BRIGHTNESS: High Quality 3582 SMD LED Light, High intensity and reliability, 300 LEDs. I…
- SAFETY: Product Advantages: it has longer life time without any COLOR FADE or COLOR CHAN…
- Always cut the LED strips at the marked cutting points to prevent damage to the circuitry.
- Use a heat gun to shrink tubing evenly if you’re using heat shrink tubing for insulation.
- Consider using a multimeter to check connections before powering the strips on.
- For longer runs, avoid exceeding the maximum length recommended by the manufacturer to prevent voltage drop.
Common Mistakes
- Cutting at non-designated points, which can permanently damage the strip.
- Not insulating the connections, risking short circuits and potential fire hazards.
- Ignoring the power specifications, leading to overloading the LED strips.
- Failing to test connections before securing the strips in place, which can lead to rework.
Troubleshooting
- If the LED strip does not light up, check all connections for proper alignment and secure fitting.
- For flickering lights, inspect the power adapter and ensure it matches the LED strip’s voltage requirements.
- In case of uneven lighting, verify that the strips are cut and connected correctly and that there are no damaged sections.
- If the adhesive fails, consider using additional mounting clips or adhesive tape for better stability.
Maintenance / Next-Time Checklist
- Regularly check connections to ensure they remain secure and free from wear.
- Clean the LED strip and surrounding area to prevent dust buildup that can affect performance.
- Inspect the power adapter for any signs of damage or overheating.
- Review lighting placement to ensure it’s still meeting your needs and adjust if necessary.
Recommended Products & Tools
- Tasodin Water-Resistance IP65 LED Strip: This flexible and cuttable strip is ideal for various applications, both indoor and outdoor, due to its waterproof rating.
- Wire Connectors: Essential for reconnecting strips without soldering, making the process simpler and cleaner.
- Electrical Tape: Useful for securely insulating connections to prevent shorts and ensure safety.
- Multimeter: A handy tool for checking electrical connections, ensuring everything is working before installation.
FAQ
- Can I cut any LED strip anywhere? No, always cut at the designated cutting points marked on the strip.
- What should I do if my LED strip doesn’t light up after reconnecting? Check all connections for proper alignment and ensure the power supply is working correctly.
- Are LED strips safe to use indoors? Yes, as long as you use them according to the manufacturer’s guidelines and specifications.
- How can I make my LED strips last longer? Ensure proper insulation of connections and avoid exceeding the recommended length for your specific strip.
- Can I use LED strips outdoors? Only if they are rated for outdoor use, like the Tasodin Water-Resistance IP65 LED Strip.

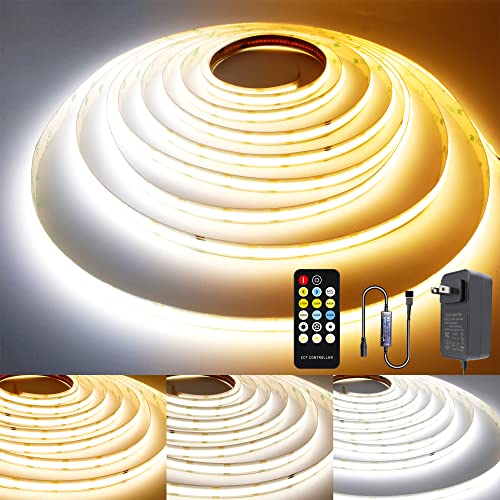
- 【Tunable White CCT COB LED Strip Light】Dimmable white light from warm white to cool whit…
- 【Cuttable and Linkable】The COB LED Strip Light can be easily cut and linked with light s…
- 【Dimmable COB LED Lights】8 levels of brightness allows you to safely adjust your 24V COB…
Wrap-Up
Cutting and reconnecting LED light strips can be a straightforward task when done carefully. By following the steps outlined above, you can ensure a safe and successful installation that enhances your home lighting. Always prioritize safety, and don’t hesitate to revisit this guide whenever you need assistance with your LED projects.
Recommended Products & Tools
- Note:Power adapter is needed but not included. If you need one, please search "Tasodin D…
- BRIGHTNESS: High Quality 3582 SMD LED Light, High intensity and reliability, 300 LEDs. I…
- SAFETY: Product Advantages: it has longer life time without any COLOR FADE or COLOR CHAN…
- 【Tunable White CCT COB LED Strip Light】Dimmable white light from warm white to cool whit…
- 【Cuttable and Linkable】The COB LED Strip Light can be easily cut and linked with light s…
- 【Dimmable COB LED Lights】8 levels of brightness allows you to safely adjust your 24V COB…

- All In One Kit. Everything you need including a 21 key RF remote, a 12V DC power supply,…
- Excellent Ambient Light Kit for the Holidays! Super bright 5050 LED Strips, Pure color(R…
- Upgraded Strong LED Tape. In order to solve the customer's troubles of the light strip a…

- 24V COB LED STRIP LIGHT KIT: HitLights COB LED strip lights are the ultimate in energy e…
- EASY TO USE: Our light strip come with a 3M strong self adhesive backing, install quickl…
- WHERE TO USE: Perfect for a variety of indoor applications such as living room, hallway,…

- Ultra-Bright & Long-Lasting:The COB LED Strip integrates multiple chips onto a single ci…
- Voice Control:Compatible with Alexa, Google Assistant,and Banlan X. Simply add Banlan X …
- UL Listed & Safe:Runs on safe 24V low voltage.UL-certified and made with lead-free mater…
- 【Ultra Bright & Longer Length】3087 LEDs on this 20ft COB LED Strip Lights(504LEDs/m),whi…
- 【The Highlights of COB】Lower power, higher light efficienc,higher color rendering index(…
- 【Safe for Daily Use】Compared to regular LED strip lights,the light is soft and uniform,w…
